How to Draw an Ornament A Step-by-Step Guide
Many signs always appear, indicating that Christmas is just around the corner. Christmas trees are one of the most notable signs of the holiday season, but as December 25 approaches, plenty of decorations are likely to appear. These can come in many variations and shapes, and learning to draw an ornament can be a great way to imagine what you’d like to display for Christmas. If you want to design your festive decoration, follow this guide! Our step-by-step guide on drawing an ornament is the perfect way to add some Christmas spirit to your day!
Also read: home drawing
How to Draw an Ornament – let’s Get Started!
Step 1
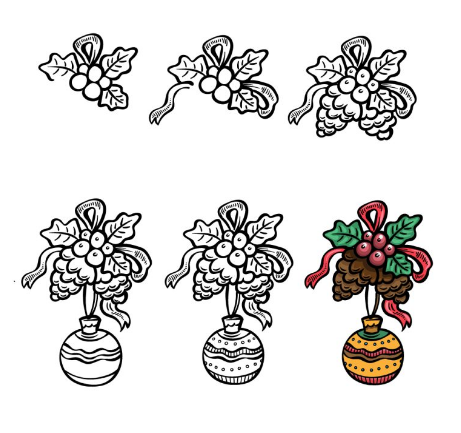
With Christmas decorations, you’re bound to see a lot of holly plants incorporated, and that’s what we’ll start with in this first step of our guide on how to draw an ornament. To get started with this look, you can start by drawing five small circles of different sizes that connect in the same way in our reference image. These circles will make up the holly berries; once they’re drawn, you can add the leaves around them. We will remove three leaves around the group of berries, and each one will have rounded lines for the outline. You can then add a center line inside each leaf and have a few smaller ones around it for the leaf ribs. The final aspect of this guide will be drawing curved lines on the holly for the piece of coiled ribbon from which this ornament will hang.
Step 2
For the next part of drawing this ornament, we’ll add a bit more to the ribbon tied around the holly. On the left side of the trim, we’ll use wavy lines to outline the tape, and there will be a forked edge at the end. You can also add minor line details, as shown in the reference image. The advantage of the ribbon on the right side won’t be connected to anything right now, but we’ll deal with that in a future step. Finally, use more rounded lines to draw another ribbon bow on the right side of the holly. You can also add line details similar to what you said on the other piece of tape.
Step 3
In this third step of our guide on how to draw an ornament, we’ll add some details to the berries you attracted and throw some pine cones into the mix. First, add a small ring near the post of each berry. Then you are ready to draw two pineapples. Each pineapple will be drawn in multiple layers, and each layer will be removed with a jagged line. You can add some simple line details to each pineapple section, and then you’re ready for the next step!
Step 4
Christmas ornaments often have colorful decorations attached to them, and that’s what we’ll start drawing in this part of your ornament drawing. First, you can pull two strings that fall between the pineapples. So, there will be a square shape. You are attached to the end of the strings, which you can then draw a large circular shape to attach. Before you continue, you can draw some decorative wavy lines across the length of the ball. It will still look a bit empty, but we’ll add more decoration details to it in the next step.
Step 5
As we mentioned in the previous step of this guide on how to draw an ornament, we will add a few more decorative details to the ball in this step. The details we said in our example are made up of tiny dots on the ornament. Along with lines between the wavy lines you drew in the last step. We chose these decorative details, but you can also use any other decoration you want! You can also add more pieces for the ornament or draw an excellent Christmas background for the image.
Step 6
No Christmas decoration would be complete without a little color. So adding a little bit is just what we’ll do in this part of the ornament drawing. For the holly part of the decoration. We used reds and greens for the berries and leaves and a beautiful red for the ribbons. We then used some shades of brown for the pineapples and finished with some bright and vibrant colors like red and yellow for the bauble. This is your chance to let your creativity flow, so you should go ahead and use all your favorite paints and art mediums to finish this off!
This is how you can Make your Ornament Drawing Even Better.
Decorate this cute ornament sketch with these 4 fun ideas to try! When you hang an ornament, you will rarely have just one. Therefore, we recommend you have a few more in this drawing of a trim. They can be the same design as this one, or they can be completely different. It is all up to you, and it would be great to create variations of this or unique designs.